$MIDPOINT_HOME/var/config.xml in an editor. Add a
<constants>
    <resourceGTESTdomain>your.googledomain.edu</resourceGTESTdomain>
    ...
</constants>
<configuration>
    <midpoint>
        <webApplication>
            <importFolder>${midpoint.home}/import</importFolder>
        </webApplication>
        <repository>
            <repositoryServiceFactoryClass>com.evolveum.midpoint.repo.sql.SqlRepositoryFactory</repositoryServiceFactoryClass>
            <database>mariadb</database>
            <jdbcUsername>redacted</jdbcUsername>
            <jdbcPassword>redacted</jdbcPassword>
            <jdbcUrl>jdbc:mariadb://localhost:3306/redacted?characterEncoding=utf8</jdbcUrl>
        </repository>
        <constants>
            <resourceGTESTdomain>your.googledomain.edu</resourceGTESTdomain>
            <resourceGTESTclientid>changeme</resourceGTESTclientid>
            <resourceGTESTclientsecret>changeme</resourceGTESTclientsecret>
            <resourceGTESTrefreshtoken>changeme</resourceGTESTrefreshtoken>
            <resourceFOOBARhost>foobar.someplace.edu</resourceFOOBARhost>
            <resourceFOOBARport>8080</resourceFOOBARport>
        </constants>
...
<expression><const>CONSTANT_VALUE_NAME</const></expression>
<configurationProperties xmlns:gen379="http://midpoint.evolveum.com/xml/ns/public/connector/icf-1/bundle/com.evolveum.polygon.connector-googleapps/com.evolveum.polygon.connector.googleapps.GoogleAppsConnector">
    <domain><expression><const>resourceGTESTdomain</const></expression></domain>
    <clientId><expression><const>resourceGTESTclientid</const></expression></clientId>
    <clientSecret><expression><const>resourceGTESTclientsecret</const></expression></clientSecret>
    <refreshToken><expression><const>resourceGTESTrefreshtoken</const></expression></refreshToken>
</configurationProperties>
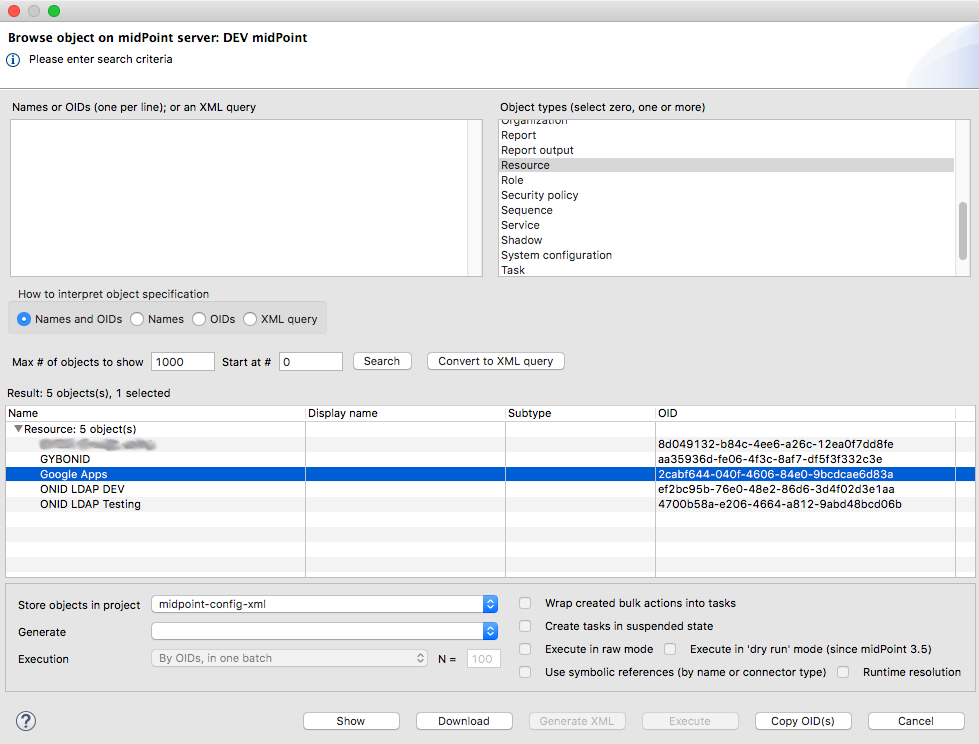
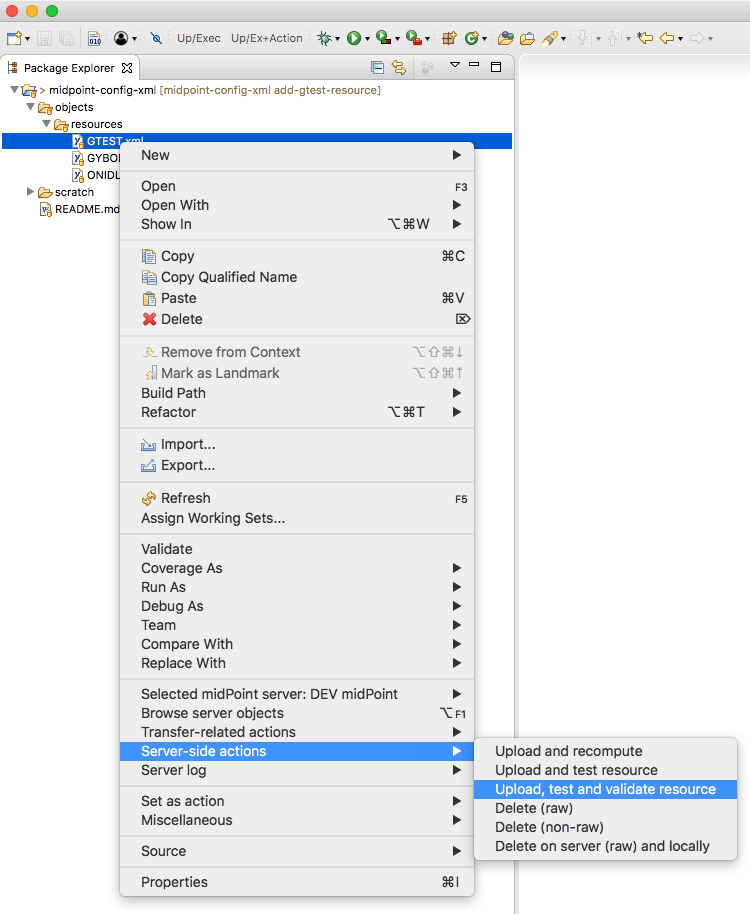
After modifying the resource configuration to use the constant values, you can test the change by viewing the resource in the midPoint UI and clicking the Test Connection button.
Stacy Brock, Oregon State University
Purpose: To help someone with no experience with midPoint be able to setup and run midPoint. Provide basic configuration to pull in users from a data source and sync that data to external target system such as LDAP.
Pull new Docker Image from Evolveum:
ON Linux VM:
add user to docker group (dont run as sudo)
docker run -d -p 8080:8080 --name midpoint evolveum/midpoint:latest |
Start and Stop container
Once you have your container created use start and stop commands for starting and stopping it.
- Start not running container:
docker start midpoint |
- Stop running container:
docker stop midpoint |
Stop command will save your configuration until you remove midPoint container.
To Stop/Start only Tomcat: enter the midPoint container bash use:
docker exec -it midpoint bash |
In Docker container fix midpoint.sh - change: #!/bin/bash to #!/bin/sh
Should be running here: http://<VMname>:8080/midpoint/
Login as Administrator with default password and changeit.
Create Incoming sync from Oracle DB
Copy Oracle Driver to VM.
/opt/midpoint/var/lib
Go to: Resources -> New Resource
Resource Basics Tab:
Add Resource Name
Connector: ConnId org.identityconnectors.databasetable.DatabaseTableConnector v1.4.2 0
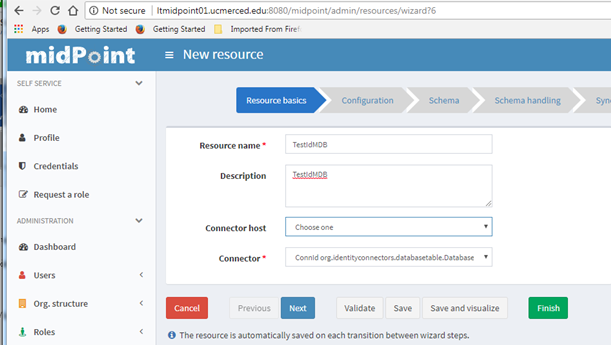
Next:
Configuration Tab:
Host: <DB Server>
TCP Port: <DB Port>
User: <DB UserName>
User Password: <DB Pwd>
Database: <Oracle DB Name>
Table: <IdM Table Name>
Key Column: <Table Primary Key>
JDBC Driver: oracle.jdbc.driver.OracleDriver
Change Log Column: <for us> OPERATIONTIMESTAMP
Schema Tab:
Should automatically bring in AccountObjectClass with all DB columns. You can remove columns if you need to, but for us we accepted them all since it’s just a view of columns we need in the DB anyway.
Next:
Schema handling Tab:
Click Add Object type to add mappings from DB to midPoint.
Kind: Account
Intent: default
Display name: Default Account
Make sure Default is selected.
Object class: AccountObjectClass
Add Attributes (Click plus + sign):
Select DB Attribute from drop down.
ri: NETID
ri: FIRSTNAME
ri: LASTNAME
Add Inbound mappings (Click plus + sign):
Select Authoritative.
Target: $user/name
Target: $user/givenName
Target: $user/familyName
Next:
Synchronization Tab:
Click Add synchronization object to add Actions for syncs.
Name: Default Account
Kind: Account
Intent: default
Select Enabled.
Add Correlation (Click plus + sign):
Filter clause:
<q:equal xmlns:org="http://midpoint.evolveum.com/xml/ns/public/common/org-3">
<q:path>name</q:path>
<expression>
<path>$account/attributes/ri:ldapid</path>
</expression>
</q:equal>
Add Reactions (Click plus + sign):
Choose Situation: Linked
Synchronize: True
Choose Situation: Deleted
Synchronize: True
Action: unlink
Choose Situation: Unlinked
Synchronize: True
Action: link
Choose Situation: Unmatched
Synchronize: True
Action: Add focus
Re-Select Enabled if it disappeared.
Next.
Capabilities Tab:
Finish.
Create the Import Sync for the Resource
Go to the Resource Details Page
Click on Accounts Tab:
Click the Import Button bottom left -> Create New
TaskName: IdMImportSync
Type: Importing accounts
Kind: Account
Intent: default
Object class: AccountObjectClass
Check Recurring task
Schedule interval (seconds): 300
Save.
Should now have users in midPoint
When it runs after 5 mins.
Go to Users -> List users
Users from IdM DB should be listed.
Create Export sync to LDAP
For us, it is Oracle DS
Go to: Resources -> New Resource
Resource Basics Tab:
Add Resource Name
Connector: ConnId com.evolveum.polygon.connector.ldap.LdapConnector v1.5.1
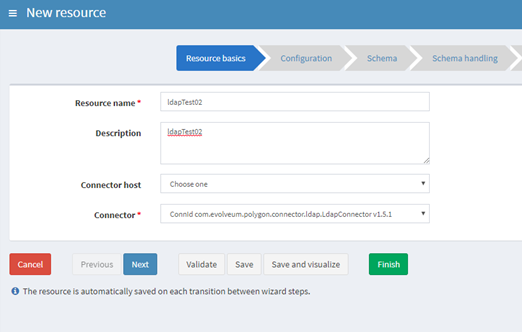
Next:
Configuration Tab:
Host: <LDAP Server>
TCP Port: < LDAP Port>
Bind DN: < LDAP BindDN>
Bind Password: <LDAP Pwd>
Connect timeout: 300000
Maximum number of attempts: 5
Base context: <LDAP base context>
Paging strategy: auto
Paging block size: 1000
VLV sort attribute: uid
Primary identifier attribute: uid
Schema Tab:
This will bring in all ObjectClasses from LDAP server automatically.
You have to edit XML to remove objectClasses that are not needed. I just downloaded to eclipse to modify then re-uploaded it.
Next:
Schema handling Tab:
Click Add Object type to add mappings from midPoint to LDAP.
Kind: Account
Intent: default
Display name: Default Account
Make sure Default is selected.
Object class: inetOrgPerson (for us)
Add Attributes (Click plus + sign):
Select LDAP Attribute from drop down.
ri: dn
ri: uid
ri: givenName
ri: cn
ri: sn
Add Outbound mappings (Click plus + sign):
Select Authoritative.
Strength Strong
Source: $user/name
Expression type: Script
Language: Groovy
Expression:
<script xmlns:org="http://midpoint.evolveum.com/xml/ns/public/common/org-3">
<code>
'uid=' + name + ',ou=People,dc=<campus>,dc=edu'
</code>
</script>
Source: $user/name
Source: $user/givenName
Source: $user/fullName
Source: $user/familyName
Make sure Default is Still selected.
Next:
Synchronization Tab:
Click Add synchronization object to add Actions for syncs.
Name: Default Account
Kind: Account
Intent: default
Select Enabled.
Add Correlation (Click plus + sign):
Filter clause:
<q:equal xmlns:org="http://midpoint.evolveum.com/xml/ns/public/common/org-3">
<q:path>c:name</q:path>
<expression>
<path>declare namespace ri="http://midpoint.evolveum.com/xml/ns/public/resource/instance-3";
$account/attributes/ri:uid
</path>
</expression>
</q:equal>
Add Reactions (Click plus + sign):
Choose Situation: Linked
Synchronize: True
Choose Situation: Deleted
Synchronize: True
Action: unlink
Choose Situation: Unlinked
Synchronize: True
Action: link
Re-Select Enabled if it disappeared.
Next:
Capabilities Tab:
Finish.
Create LiveSync for the Resource
Go to the Resource Details Page
Click on Accounts Tab:
Click the Live Sync Button bottom left -> Create New
TaskName: LdapExportSync
Type: Live synchronization
Resource reference: <Resource Name>
Kind: Account
Intent: default
Object class: inetOrgPerson
Select: Recurring task
Schedule interval (seconds): 300
IdM users should be synced: Oracle -> midPoint -> LDAP
It took 2-3 days to initially import 100k users from our test LDAP, so we will work on performance tuning next.
In our previous blog post (see Chop Down the Beanstalk, Open Up the Fargate), we examined our path to using AWS Fargate as our container deployment host. I'm pleased to say, Illinois has achieved success in deploying the TIER Docker images in AWS Fargate, in particular the Grouper and Shibboleth images, so far in a testing environment, but with hopes of moving to production as soon as July.
Many of you may have seen our demo at the Internet2 Global Summit TIER Showcase, showing our prototype Grouper installation. That was the initial milestone of success, but we have continued to build on that by fine-tuning the deployment, adding the back-end database using AWS RDS, and adding an endpoint to the Application Load Balancer (ALB). In addition, we have repurposed the same code and CI/CD methods to deploy our first Shibboleth test instance in AWS. Here's a quick overview of the components that helped us achieve successful deployment.
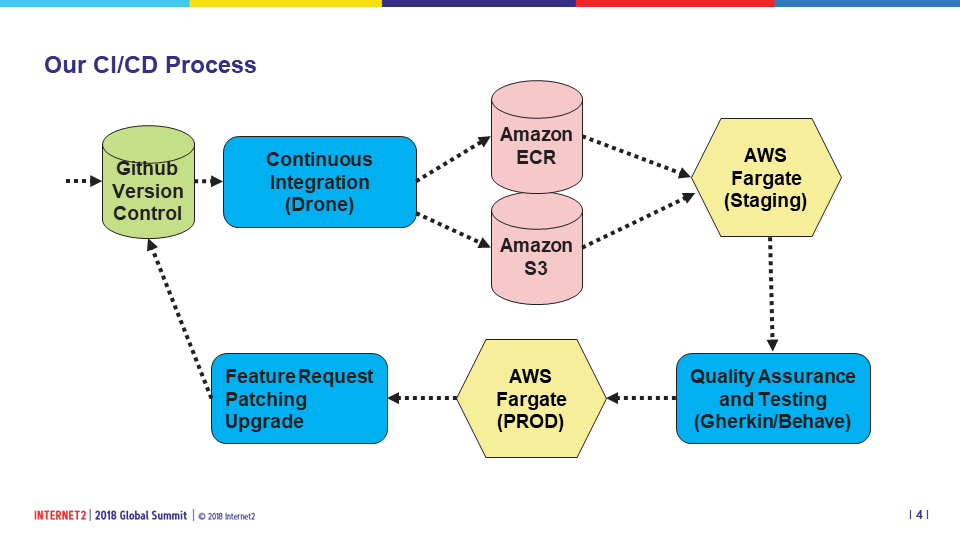
Our software development team are more than just developers, they have been the pioneers of our DevOps process of continuous integration and continuous delivery (CI/CD) using AWS, in conjunction with tools such as Github, Terraform and Drone. Here's a look at a simplified version of our process, as shown on a slide during the TIER Showcase demo:
Github (Version Control)
Github has become our repository for all AWS code. Github has been in use by our software developers for some time, but in the DevOps world, with infrastructure as code, our service admins have no become Github Repo contributors. In our design, a particular service is derived using two repos: One containing the re-usable central Terraform modules that our software development team built, and then a separate repo that contains our Docker configurations and software configs. As a new service is launched in AWS, a new branch of the central service terraform module is created with a new folder in the region of deployment (i.e., us-east-2/services/<servicename>) containing small number of files for the specific Terraform declarations needed by the service infrastructure, with a reference back to the main modules, leveraging Terraform's modular capabilities to re-use code.
The Docker build is stored in the other repo and contains our sets of Dockerfiles, along with the configs and secrets that are to be added to the images. Although the repos go hand-in-hand to deploy a service, it is important to observe the distinction: the Terraform codes builds the AWS infrastructure that defines the service (the virtual hardware), while the Docker code builds the images that are pushed to the Amazon Elastic Container Registry (ECR) (the operating system and software). That is, once the infrastructure is built, if there are no changes to the networking or container definitions, the service images themselves can be quickly updated using the ECR and the containers restarted, without redeploying infrastructure.
Terraform (Infrastructure)
The Terraform code is executed using a useful wrapper known as TerraGrunt by GruntWorks, that preserves the Terraform state in an AWS S3 bucket automatically. Once we have our Github repo of our service branch of the Terraform modules, we can first preview the components being built using terragrunt plan, and check for any errors. Once this looks good, we simply issue a terragrunt apply to execute the code. Typically there will be a dozen or so components "constructed" in AWS, including load balancer endpoints, clusters, networks, service names and tasks.
Docker (Images)
As mentioned, the service configuration of Grouper is based on the published TIER Grouper Docker images. Shibboleth follows the same path using TIER Shibboleth images. Custom Dockerfiles were built using a two-layer model of a customized "base" image, and then further customizations for each Grouper role being deployed. More on that in "The Finished Product" section below.
Drone (Pipelining)
As of this writing, we have not yet implemented the Drone components, but the main purpose of Drone is to "watch" for a new commit/push of the infrastructure configuration in Github, and instigate a build/rebuild of the infrastructure in a staging area of AWS using a docker push. We will update you more on Drone configuration in a future blog post.
In Drone's place, we have basically scripted a similar behavior that logs in to aws, grabs the docker login command, builds the Docker images locally, tags them and pushes them up into the Amazon ECR. With the infrastructure already built, it's simply a matter of STOPping the running container, so that it restarts with the newest image, tagged "latest".
Behave (QA Testing)
Like Drone, we still have work to do, but have chosen Behave for our QA testing suite. Once this process is refined, we will be sure to describe this in a follow-up post.
The Finished Product
Using the TIER Demo packaging as a starting point, we defined our base infrastructure for Grouper to have three active containers: a UI, a Webservice, and a Daemon node. This was basically accomplished with three separate Terraform configurations and three different task.json files, to allow unique customizations of network port exposure and memory sizes needed by each Grouper role. As mentioned before, this was stored in a branch of our central modules code.
Following the same three-node model, the Docker configuration followed in a similar way. First we built a customized "Grouper Base" image, which derived from the original TIER image (FROM tier/grouper:latest), but added our custom configs pointing to the RDS instance of the grouper database, configs for connecting to the campus Active Directory (which happen to have domain controllers as EC2 instances in AWS), SSL certificates, credentials and secrets, etc. that were common to all three nodes. Then each node had its own individual Dockerfile that derived from our Grouper base image, to add additional specifics unique to that image. Once all the images were built, they were tagged using the AWS ECR repo tag and Docker Push'd up to the ECR.
Once the images were uploaded to the ECR, we were able to run the Terraform (using Terragrunt) to launch the service. Within minutes, we had running containers answering on the ports defined in the task.json file, and we could bring up the Grouper UI.
More to Do
Still more integration needs to be done. Besides the Drone and Behave processes, we have to conquer a few more things.
- Converting our RDS instance as a separate code. Generally, with a persistent database, you don't want to continuously burn down and redeploy, so we have to treat this special, but we do want it in code so that the configuration is self-documenting and reproducable, for example to bring up a cloned instance for testing. For now we just "hand-crafted" the RDS instance in the AWS console.
- Tackling DNS One issue with cloud-hosted solutions is the DNS nameservers. While we have our own authoritative nameservers for all things illinois.edu, we must have our DNS configuration for AWS in their Route 53 DNS resolvers. This requires us to delegate a particular zone, so that we can associate our ALB endpoints with static, resolvable hostnames in our namespace. In turn, we can define friendly service CNAME records in the campus DNS to point to the Route 53 records.
- Shift to blue/green deployment methods We have to shift our thinking on what a "test" environment really is, and move toward the blue/green concepts of DevOps. This changes the way we think of changes to a service and how it is deployed, but the CI/CD model.
- Autoscaling Nodes We one day hope to configure AWS to just add more UI nodes or more Daemon nodes or more WS nodes if/when the load gets to a certain level that we need to spread the work. Lots of testing and evaluating how that behaves in the Grouper architecture.
- Grouper Shell Node We have settled on the idea of a separate and longer-living EC2 instance that contains Grouper and SSH to allow us remote access and to execute GSH scripts against the AWS instance of Grouper. It would be interesting to experiment with the idea of converting some of the oft-run GSH scripts into individual launched Fargate instances that just run and die on their own, perhaps on a schedule.
We plan to demo much of this at the June 19th TIER Campus Success meeting. Bring your questions and feedback!
.
├── README.md
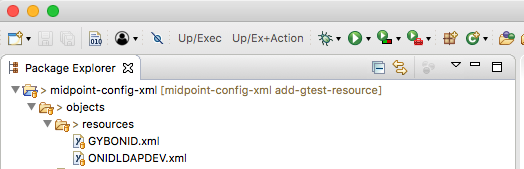
└── objects
└── resources
├── GYBONID.xml
└── ONIDLDAPDEV.xmlmidpoint-config-xml
└── objects
└── resources
├── GYBONID.xml
└── ONIDLDAPDEV.xml
$ git add GTEST.xml
$ tree
midpoint-config-xml
└── objects
    └── resources
        ├── GTEST.xml
        ├── GYBONID.xml
        └── ONIDLDAPDEV.xml

Stacy Brock, Oregon State University
As background, Georgia Tech's Information Technology Group (ITG) has been working on a project to integrate Grouper with their Door Control system. They have utilized Georgia Tech's Identity and Access Management (IAM) department's internal ESB, BuzzAPI, as a proxy to Grouper's Web Services. Through BuzzAPI, ITG can maintain special Door Control Grouper groups that leverage reference groups sourced from GT's LDAP (GTED). ITG's Door Control groups are then provisioned back to GTED as entitlements. ITG's Door Control software can then read ldap entitlements to determine a person's access to a door. ITG has also built UI's for viewing a person's Grouper memberships as well as for allowing admins to create memberships through their custom UI.
A problem has surfaced recently in ITG's UI when creating memberships. They would like to be able to add multiple people to groups at once and at the same time add a group as a requirement, or condition, of membership. To make the selection of the conditional group easier, they are using Grouper Web Services (proxied through BuzzAPI) to find all the groups that the selected population have in common. The goal is to then present the intersection of groups as a selection set for the admin user to choose as the conditional group(s).
There have been a couple hurdles to this process that will require some thought. Firstly, ITG is using Grouper Lite Web Services which can only be called for one person at a time in order to retrieve their memberships. When you have many people's memberships that you are trying to retrieve, store, and compare, the resulting response time isn't desirable. Secondly, the memberships that would be used as conditions, like affiliation with a given department, are sourced from LDAP. An idea was floated to first query these affiliations from LDAP for efficiency's sake and then translate the LDAP affilations to Grouper group names. The problem therein lies with the fact that our LDAP affiliation names do not intuitively match their corresponding Grouper group name which makes it difficult to build a successful Web Services call to create the conditional membership.
To get around these problems, there are multiple solutions that we are looking into. The most attractive option may be to use Grouper's Batch Web Services that allow for multiple subjects to be queried at once. This may create efficiencies when trying to retrieve all the common memberships in Grouper for a given selection of people. The other option would be to store the exact LDAP affiliation name in Grouper alongside the resulting Grouper affilation group. This is already being done in the Grouper group description for these affiliation groups, but we might be able to make it more visible by storing it in a custom attribute or somewhere where it could be queried more easily.
The GT IAM and ITG teams will continue to look into good solutions to this problem of finding membership intersections for large groups of people. There may be a much easier way to do this that we haven't discovered. Please feel free to leave a comment if you have encountered similar issues and ended up solving them. We'd love to hear from you.
Today UMBC runs a small local Grouper implementation. Like other instutitions we initially struggled with installation, group naming, folder hierarchies, etc. Then we found the TIER Grouper Deployment Guide and the TIER Folder and Group Design section. It has helped us come up with a consistent naming system. We started prior to the publishing of these document so the initial implementation was a lot of trial and error. Then TIER was released and later we became part of the Campus Success Program (CSP).
As part of the CSP we began testing the Grouper Docker container. The first few container deliverables were a work in progress. The latest unified container delivers on the promise of a functioning container that can run Grouper with minimal configuration. No more struggles setting up new servers. Recently we experienced an issue with a production server. In a matter of a few hours I was able to configure and start a production server. While somewhat a head of our intended schedule we are now running production containers for the ui-ws and daemon. This is just the start of our journey with containers. Orchestration and cloud services will hopefully follow, allowing more time to utilize additional Groupers functionality.
Lafayette College is a long-time operator of a locally-run Shibboleth Identity Provider (IdP). When it came time to develop a web portal for the College and configure it and other services for Web SSO, we had to think about what we wanted our Web SSO behavior to look like. Providing a robust user experience was important, so we made the decision to make CAS central to our Web SSO strategy.
We integrated the shib-cas-authenticator plugin with our IdP for its capability of delegating authentication externally from Shibboleth to CAS, which serves as our SSO front end. This bridge between Shibboleth and CAS is a key piece of our authentication architecture. But when we became aware that being able to log into the InCommon Certificate Service using SSO would require supporting the REFEDS MFA Profile, we didn’t know how the bridge would handle MFA signaling. Our interest in Internet2’s TIER Initiative raised another question: could our customizations be added to the IdP packaging?
Though Lafayette couldn’t attend the first TIER CSP F2F in person, we were able to work with the TIER SMEs remotely to get an idea of how this would be possible. Our engagement with Unicon for the Campus Success Program included helping us deploy the IdP package and incorporate our requirements for MFA signaling and the shib-cas-authenticator. They put together a beta release, shib-cas-authn3, that was able to handle the REFEDS MFA Profile. That solved one of our problems.
But what about adding it to the IdP package? The IdP component packaging owner saw no risk in adding a configuration option for Lafayette. Collaboration took place on the packaging front with Unicon and TIER to refine the package, incorporate Unicon’s work, and provide fixes for misconfigurations that were introduced. The result was a solution for copying over required files.
A Dockerfile contains the “recipe” for executing command line instructions that create an image. Multiple arguments allow the basic recipe to be customized. After we tested and verified the behavior of the new shib-cas-authenticator with the MFA Profile support, it was ready to be added during image creation. We added build references to the JAR file from Unicon and to our local configuration files. An additional step rebuilds the IdP WAR file to include these artifacts that provide the local configuration options that we know and love.
Many thanks to Misagh Moayyed and Paul Caskey for rising to this challenge.
-John Kaminga, University of California - Merced
Our current IdM system stems from migrating off our old Waveset IdM into MIM (Microsoft Identity Management) with our business logic implemented in Java and an Oracle Database for the person registry. We have 2 main systems of Record, Banner for our student and applicant population and a UC-Wide Peoplesoft system for our employees. We also have a UI built on Angular and using REST to connect to the Oracle back-end. The UI allows admin users to create and edit accounts and allows users to claim their accounts and reset their passwords.
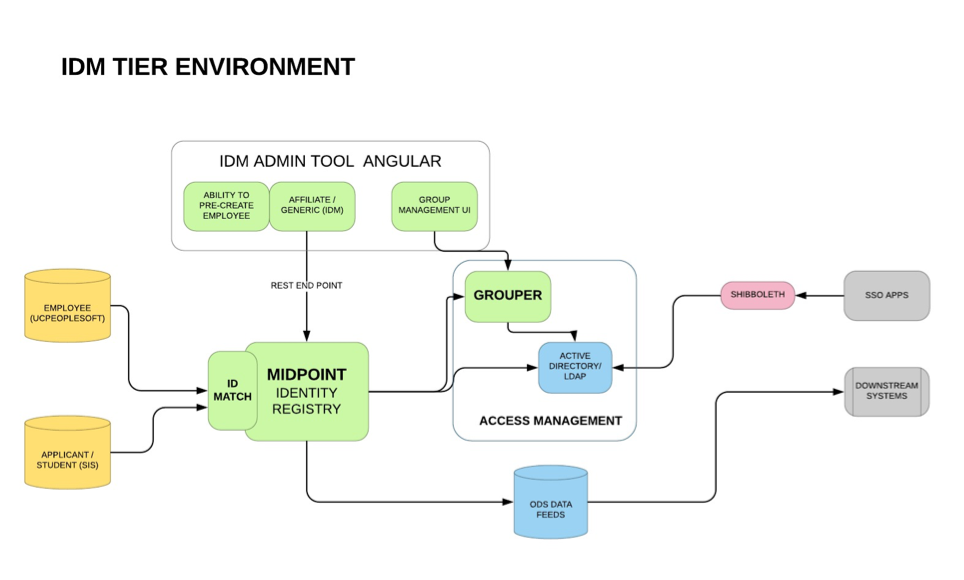
We are looking to use midPoint as our Person Registry. At TechEx 2017, we were very interested in learning about midPoint. When I heard that it had a built-in connector for slack, I was excited because we use Slack. However, when I saw the demo it occurred to me that we want to minimize our downstream feeds from IdM. Preferably, we only want our Identity Management system to send data to Ldap/AD and ODS. Any system should be able to get the data it needs from those systems.
In the past, before my time, the philosophy seemed to be if some department needed student data they went to the Student Information Systems team and If someone needed staff data they went to the Business and Financial team. But, if they wanted both they went to the IdM team, so unfortunately, we ended up with many data feeds from the IdM system to downstream systems, most of them nightly feed files. This became a nightmare to maintain and took up more and more of our developer’s time.
We’ve made a very determined and conscious effort to stop feeding downstream systems from the Identity management system, by sending them to the Data Services team ODS if they need any more data than what’s in Ldap/AD. This has allowed us to concentrate on populating our Ldap/AD with only user and access data.
Last fall, Amazon Web Services announced their latest and greatest in container orchestration and clustering technology: ECS Fargate. This caused many organizations, including those of us here at the University of Illinois at Urbana-Champaign, to take a step back and re-think our cloud deployment plans. Prior to the release of Fargate, an organization could containerize in AWS a couple different ways. One way is the Elastic Container Service (ECS), previously "EC2 Container Service," which gave you great flexibility, but at the expense of managing the underlying clustered hosts. There was also the lighter weight Elastic Beanstalk offering: the clustering platform was managed automatically, but there wasn't as much configuration wiggle room, and was mainly geared toward websites. Illinois was moving forward with Elastic Beanstalk for the majority of our cloud applications. Then, the new guy walked in the door.
With ECS Fargate, the underlying clustered hosts and orchestration is handled for you. You can focus completely on your containers and clustering parameters. But, unlike Elastic Beanstalk, you could be more flexible in your configuration. For instance, in Elastic Beanstalk, every container in a cluster scales as a unit. There wasn't room for, say, running a bunch of application containers that autoscaled but with only a single management node. Elastic Beanstalk made a lot of decisions for you. With ECS Fargate, those decisions are now parameters exposed to the service architect.
So, what's the catch? There isn't really a major one. For Illinois, we had created Terraform modules that made it easy to stand up a new service in Elastic Beanstalk. Those underlying modules had to be rewritten to build and deploy to a Fargate cluster. But, because things have been designed in modules with our Terraform code, this didn't require a rewrite of everything. We just had to replace the Elastic Beanstalk specific pieces with Fargate ones. One notable downside discovered initially is that ECS Fargate has a larger price tag than straight ECS clusters. But, unlike Elastic Beanstalk, multiple applications on Fargate can share a single load balancer. So at the end of the day, the final bill might end up being cheaper.
As of now, we're currently in the final stage of replacing that Terraform code, and we'll soon be deploying TIER containers of Shibboleth and Grouper to ECS Fargate. Stay tuned for a future blog post to hear how that goes.
As we continue on our Grouper journey here at University of Michigan, we’re faced with a number of questions. With a large number of groups across campus for a wide range of uses, we’re working to better understand the various needs and what that means as we make decisions about our Grouper deployment.
Currently being explored are folder structure and security within Grouper. We want something that fits both our “new” offering of departmental data-driven groups but that will also make sense to users of our existing groups system and allow us to transition other use-cases to Grouper in the future. Our initial pilot case is to use reference groups created from HR data to build an “All Staff” group for our Business and Finance department that’s primarily used for email and collaboration within Google. We’re planning on using a folder hierarchy using our department structure to manage access to the department based groups.
We’re looking forward to engaging more with our CSP partners as well as reaching out to other seasoned Grouper schools to hopefully gather some lessons learned and practical advice to consider along with the great guidance we’ve gotten so far.
Having made progress on the technical and logistical issues related to getting Grouper up and running in our environment, it’s onto identifying and working toward the improvements that are meaningful to our users. Our upcoming cohort discussion takes place Thursday, March 22 at 10AM ET and will focus on these topics and give us a chance to learn more about how other schools are organizing and managing access to Grouper. (https://bluejeans.com/7347095462)
As an investor campus, Lafayette College believes in the TIER vision. So, we were happy to be selected as one of the ten institutions chosen to participate in the Campus Success Program. In our proposal, we committed to integrating the TIER Shibboleth IdP package and evaluating the fourth TIER component, the midPoint identity registry.
The three TIER components were already a key part of our identity management system. Lafayette joined the InCommon Federation in 2007 and we were an early adopter of Shibboleth, running a local Identity Provider at our small liberal arts college. Recently, we became heavy users of Grouper and worked with Spherical Cow Group to add features to COmanage to support our use case for provisioning accounts and identity lifecycle management for affiliates of the College. Still, this all didn’t mean there were no operational gaps needing to be addressed.
Moving to a containerized version of the IdP seemed like an easy decision for us. We aren’t yet using Docker at Lafayette so there is a learning curve there and we need to work out the environmental requirements. The benefits we see in the TIER package are ease of deployment to new nodes and a default configuration geared towards doing things the InCommon Way: an interoperable IdP that releases a default set of attributes and supports MFA.
Being able to investigate how the midPoint entity registry works really piqued our interest. Our system of record for faculty, staff, and students is Banner. We have a custom-engineered IdMS for faculty and staff onboarding. It’s a mix of web forms, a database, and Perl scripts that provision accounts to our LDAP directory. Provisioning of students we do using extracts from Banner and scripts. So, the process is manual. The goal of hooking up midPoint to Banner to get the identity data to flow will be finally doing near real-time provisioning from our ERP. That’s been a long time coming. We’re also looking at creating and assigning our digital identifier, the Lafayette NetID, using midPoint. We’ll see if midPoint has a capability that can do that.
As we move towards migrating our Shibboleth IdPs to Amazon Web Services, we have an even greater need to remove its dependency on multiple LDAPs and consolidate all necessary user data to the Active Directory. In addition, as we implement Grouper as the central authorization management tool, we need to ensure that PII is available for authorized applications and units to consume, in order to provide the same user experience regardless of data suppression. Because our AD is a critical component of so many services across campus, it made sense to provide greater functionality and greater security for the good of our campus.
The University of Illinois at Urbana-Champaign has historically maintained two LDAP instances that served slightly different flavors of directory information. One LDAP instance (what we call the Campus LDAP) contains all user attributes with access restrictions on sensitive data classes, while our Active Directory LDAP contains somewhat of a "redacted" identity for those users with FERPA-protected attributes. These redacted identities in AD have no personally identifiable information (PII); this was accomplished by suppressing several personal name attributes (givenName, sn, etc.) in AD by replacing them with null values or a NetID (our name for the logon ID). This has proven to be a poor experience for both the user as well as for units and applications that provide IT services to those users.
In order to eliminate duplication and also provide the best of both LDAPs, our Identity and Access Management team decided to keep the Active Directory and retire the Campus LDAP. This meant that we would need to converge all of the existing attributes and ensure that sensitive data on FERPA-protected users was readily available in the AD, without compromising access controls on those attributes. The solution we arrived at was to create a set of "shadow" attributes that contained all of the PII, while placing them in a custom property set, protected with privileged access. This solution perpetuates the redaction of PII from default attributes that are accessible to the general authenticated public, while providing service accounts and applications the necessary privileged access to the real data. It also requires zero touch by current services-- they can continue to consume the same data as they are used to now without any changes, or they can opt to apply for the privilege to access the protected attributes.
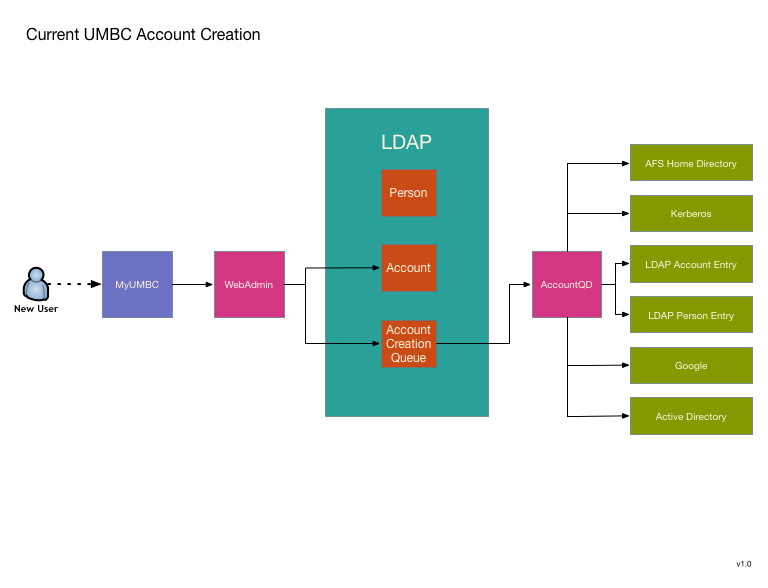
UMBC has been using a custom IDMS system since 2002. Over the years it has grown quite extensive, so replacing it is no small matter. We are looking to use MidPoint as a replacement, and my desire is to avoid a large "switchover date". Instead replacing pieces as they become available. To this end I've decided to start with two functions that are relatively isolated and can also be greatly improved by transitioning to MidPoint. The first is UMBC's account provisioning engine. It seems like a good candidate because it is a currently a single standalone process that could use a rewrite to improve its robustness, logging, and modularity.
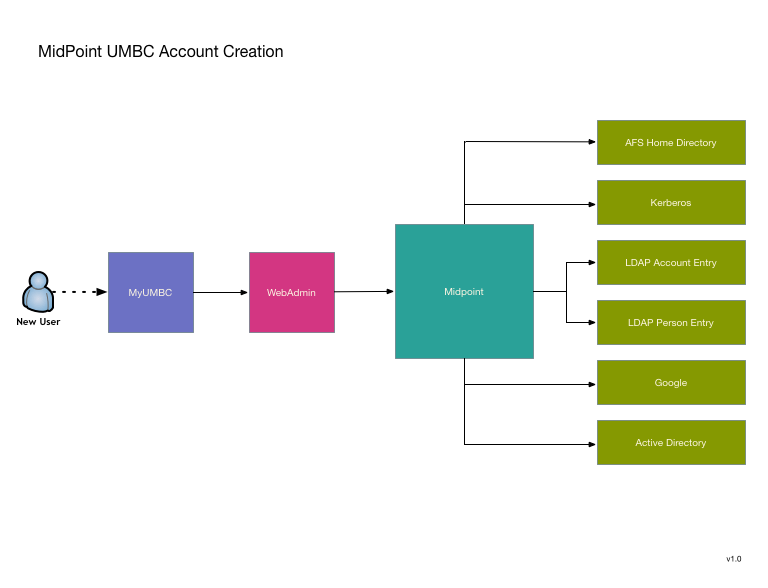
Transitioning to MidPoint will not substantially change the model, but will offer allow MidPoint's improvements without reliance on major shim code writing that will have to be replaced as we do additional migrations toward total conversion to MidPoint.
The second function that appears to be a good candidate is UMBC's guest account request system. Currently there really isn't one, or rather there are four completely different systems that combine to cover most of the use cases. These could all use improvement and I think that a unified conversion to MidPoint will allow improvements as well as a workflow simplification.
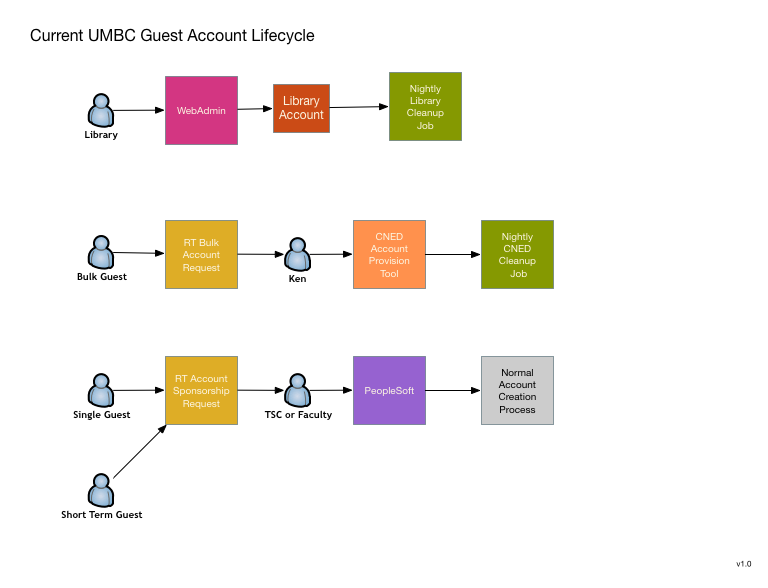
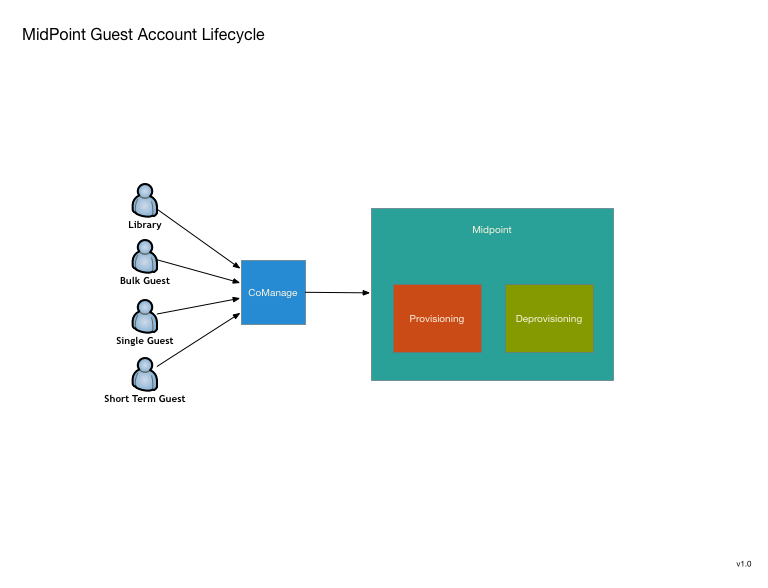
This is primarily a request system, although some of the current systems do perform their own provisioning and de-provisinioning within a limited scope. It is still unclear to what extend MidPoint can be used as an end user request or approver UI. If it is unable to be used in this way, I'm looking at using possibly using CoManange to perform these UI functions rather than writing something myself.
We had four attendees at the Face2Face Meeting, Randy Miotke and Jeff Ruch are our technical team members, Scott Baily our campus lead, and Dave Hoffman from project management. Our entire group found the experience very worthwhile and came back with a lot of positive feedback.
Our technical team, through discussion and presentations, are now looking to use COmanage as the source of record for the external to CSU population and then provision to midPoint registry. We will use midPoint as the primary entity registry and leverage its provisioning capabilities. They both appreciated the Grouper office hours that were provided as several items that they were struggling with were resolved on-site.
From a project management perspective, developing networking with other institutions and discussing common issues was important. Moving forward, collaboration around how to better engage and work with vendors is something that needs to continue. Along with our technical team, he found that discussion regarding implementation plans around Midpoint and sharing of project plans will be invaluable as we begin looking at this process.
Our team at CSU is in the final stages of implementing COmanage for use as an entity registry with account linking capabilities for use with our department of University Advancement’s Donor Connect system. Here’s how it will work:
A user will go to the Advancement website to access the Donor Connect system; this is our first service provider where we will be implementing this process and there is interest from other departments and system for future expansion. The user will be given options of logging in with the CSU Identity Provider or if the user is not affiliated with CSU another discovery service like Google, Facebook, MSN, etc. Once they select the system they prefer, they will be redirected to that site for authentication. Upon successful login to that system and permission has been granted to share account information with the service provider the Social to SAML gateway will route them back to the Donor Connect page.
At this point, our system will look for a match in our LDAP directory; if there is no match, the user will be put through a verification process. Once they have been verified their information will be logged in COmanage. If the user is already affiliated with CSU they will be in the registry from the data load from our internal HR and Student systems. We will then have both internal and external records in the COmanage Registry.
It will create a unique ID that ties multiple accounts to one person for a quicker authorization process for future access. There is a provisioning process set up to send COmanage person and identity data to the LDAP directory in order for it to be logged and a match to be found the next time a user logs in. There is also a provision in Grouper that sends group data which is also pulled from our internal CSU systems to the LDAP directory.
As of today, person data from CSU systems has been loaded into COmanage and group data has been loaded into Grouper. COmanage and LDAP have production instances in place and the Grouper production instance is being finalized based on deployment guidelines. After this project launches our team will look at containerized versions.