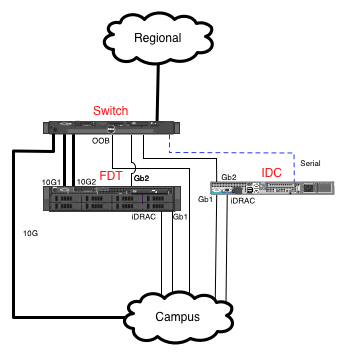
A generic DYNES installation at a non-connector (typically a campus) site consists of:
- IDC Server
- FDT Server
- Switch
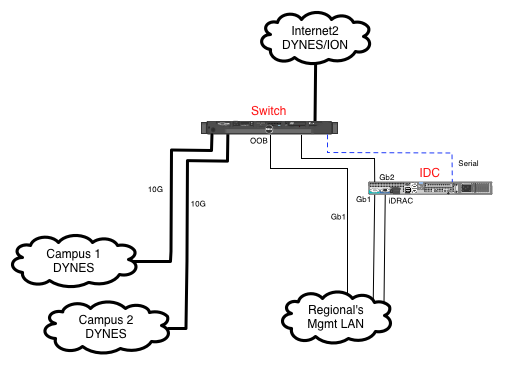
A generic DYNES installation at a connector site consists of:
- IDC Server
- Switch
Post-Install Testing
Once the equipment is installed we ask that you please test connectivity to your system's
emote access card and to the host itself via ssh. Once you have done that please see
DYNES_System_Configure_Test_README (also included below) for further system configuration
and testing instructions. All DYNES documentation is located in /usr/share/doc/dynes.
Test remote access interface (iDrac6)
-------------------------------------
Please test the iDRAC6 with a web browser (https://IDRAC_IP)
You can find out the configured IP from /etc/dynes/dynes-config-yoursitename
remote access user: admin
default password: senyd2011
!! BE SURE TO CHANGE THIS PASSWORD IN THE REMOTE ACCESS INTERFACE !!
Administrative and root Users
-----------------------------
The system default "root" password is: senyd2011
The system default "admin" password is: senyd2011
!!! BE SURE TO CHANGE BOTH OF THESE PASSWORDS!!!
You may also create your own user accounts on the system and install public keys for those accounts.
Root logins over ssh are not permitted. The user "admin" has been created for use by site
personnel to login and administer the system as needed. It has "sudo" capability. SSH logins for
any account are allowed only using key-based login. From the console you will need to put your
ssh public key into /home/admin/.ssh/authorized_keys. This is the .pub suffixed file created in
your .ssh directory after running "ssh-keygen". Copy this file to the DYNES host and put it into
authorized_keys. The keys file should be owned by "admin" and have rw permissions (0600). Example:
Create /home/admin/.ssh if necessary, chmod 0700:
drwx------ 2 admin admin 4096 Jan 27 12:01 .ssh
cd /home/admin/.ssh
cat id_dsa.pub >> authorized_keys
chmod 0600 authorized_keys
Should look like:
-rw------- 1 admin admin 417 Jan 27 12:01 authorized_keys
Logins as "root" over ssh are not allowed. Use the "admin" user for ssh logins. You may also
create new user accounts on the systems as you see fit. All ssh logins will have to use a key -
password logins are not enabled.
For more documentation refer to /usr/share/doc/dynes. If this is an IDC server, see
/tftpboot/dynes for your site switch configuration and current switch firmware images which can be
copied to your switch after enabling the tftp server on this machine (/etc/xinetd.d/tftp). Update
instructions are in the documentation directory.
A sample dhcpd.conf file to allow automatic on-boot switch configuration from the IDC host is in
/etc/dynes/sysconfigs. Copy to /etc/dhcpd.conf and update MAC address. Also requires tftp server
to be enabled.
Your switch should arrive already configured and with correct firmware, however it is possible
firmware updates may one day be required. The above configurations are also provided for the
convenience of DYNES personnel setting up switches.
BE SURE AND CHANGE THE iDRAC6 "admin" USER PASSWORD!!
BE SURE AND CHANGE THE SYSTEM "admin" AND "root" USER PASSWORDS!!
Configuring system (if you installed the RPMS yourself)
-------------------------------------------------------
Most sites will receive the IDC and FDT systems already fully configured and will not need to
perform these steps. If you installed the DYNES RPMS yourself please follow the steps below to
complete the configuration.
1) Install dynes-config-yoursitename RPM with yum (if not already)
2) Edit the /etc/dynes/dynes-config-site script to put in the local information required
3) Run the '/usr/sbin/install_dynes.sh' script
4) Change the system passwords for "admin" (sudo capable site admin user) and "root"
4a) See below for more information about setting up the system for ssh access by site personnel.
5) Reboot at your convenience
This should install/configure:
a) This host's email and node type for DYNES
b) net-snmp (setup with DYNES RO community)
c) Dell OMSA software and latest firmware
d) syslog-ng (setup to report to DYNES syslog-ng host)
e) iDRAC6 cards including alerting
f) iostat monitoring (accessible via SNMP or Cacti)
g) A serial console for use with SOL (Serial Over Lan / IPMI)
DYNES SYSTEM Configure and Testing Instructions
This document provides details on the DYNES System configuration and test. The file covers the standard DYNES System Configuration which includes the following equipment:
-Fast Data Transfer (FDT) Host
-InterDomain Controller (IDC) Host
-Ethernet Switch (SW)
Sites which have non-standard DYNES equipment and/or configurations should use this file for guidance and contact the DYNES support team as needed for additional assistance.
This README_DYNES_System_Config file is available on the IDC and FDT in:
/usr/share/doc/dynes/README_DYNES_System_Config
DYNES equipment site specific IP addresses and other configurations are available on the IDC and FDT in:
/etc/dynes/dynes-config-site
----------------------
DYNES System Configure and Testing Instructions
----------------------
1) Initial system installation and access configuration
2) Update IDC VM site local passwords
3) Install host certificates on IDC
4) Install host certificates on FDT
5) Set up peering between local IDC and remote IDC
6) Set up accounts between local FDT and local IDC
7) Test provisioning between local site and a remote DYNES site
Additional instructions for each of the above steps are provided below.
1) Initial system installation and access configuration
Instructions for initial system installation and access configuration are provided in the following files:
DYNES System Installation and Switch Initial Configuration:
/usr/share/doc/dynes/dynes-switch-config-<dynessitename>.docs
DYNES IDC and FDT Initial Configuration:
/usr/share/doc/dynes/README
The above files include instructions on using/enabling ssh access for the DYNES SW, FDT, and IDC using the "admin" account. The "admin" account is intended to be used for site local operations and the default password should be changed to a site local value. The following account configurations are covered in the above documents:
IDC and FDT: "admin" account #described in README
IDC and FDT idrac: "admin" account #described in README
Switch: "admin" account #described in dynes-switch-config-<dynessitename>.docs
Please follow the instructions in the above two documents prior to proceeding to the below steps.
2) Update IDC VM site local passwords
The InterDomain Controller software runs in a Virtual Machine on the host IDC. There are some passwords on the IDC VM which should be changed to site local values. These are listed below. The initial password is set to the standard DYNES default value.
Site Specific Accounts:
a) idc vm: "root" account
b) idc vm oscars gui: "site_admin" account
c) idc vm oscars gui: "idc-<dynessitename>" account
d) idc vm oscars mysql: "oscars" account
e) idc vm oscars mysql: "root" account
Note: We will either provide further instructions for each of these, or provide a script to change them all at one time. For now please contact the DYNES Team at the contact information provided below.
3) Install host certificates on IDC
Note: We will provide additional instructions including a script to install these certs. For now please contact the DYNES Team at the contact information provided below.
4) Install host certificates on FDT
Note: We will provide additional instructions including a script to install these certs. For now please contact the DYNES Team at the contact information provided below.
5) Set up up peering between local IDC and remote IDC
Note: We will provide additional instructions for this. For now please contact the DYNES Team at the contact information provided below.
6) Set up accounts between local FDT and local IDC
Note: We will provide additional instructions for this. For now please contact the DYNES Team at the contact information provided below.
7) Test provisioning between local site and a remote DYNES site
Note: We will provide additional instructions for this. For now please contact the DYNES Team at the contact information provided below.
-------------------------
DYNES Contact Information
-------------------------
For problems with the DYNES System installation, configuration and access,
please send email to dynes-sysadmin@internet2.edu.
We welcome your comments and feedback on these specific instructions.
Please send along any comments or critiques about these instructions
to the above maillist so we can improve them.
-----------
Useful URLS
-----------
You can refer to the documents enclosed in your shipment or the
following URLS:
The DYNES website is http://www.internet2.edu/dynes