This page is obsolete. Refer instead to Grouper Provisioning Plugin.
COmanage Registry can be connected with Grouper for three purposes:
- For Grouper to use Registry as a subject source (a source of identifiers which can be managed with group memberships).
- For Registry to obtain and manage the group information it needs to operate.
- To provision data that can be used to construct groups within Grouper.
These are configured separately – it is not necessary to use Grouper for all three purposes.
Overview of Registry + Grouper Integration
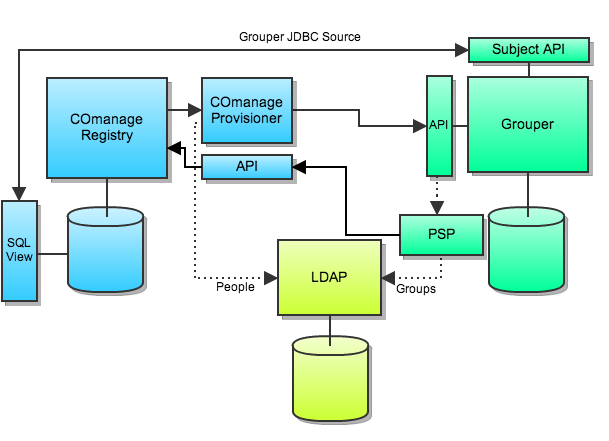
- Grouper JDBC Source indicates Grouper using the Registry database as a subject source.
- Grouper DataSource indicates the bi-directional flow of group data used by Registry.
- Option 1 and Option 2 indicate the methods for provisioning Registry data into Grouper, described below.
- The dotted lines indicates how Registry and Grouper data jointly populate LDAP, each authoritative for different data.
Configuring Registry to supply Subject source information to Grouper
Grouper version 2.1.2
These instructions are written for Grouper version 2.1.2 and assume a working knowledge of Grouper, the Grouper UI, and Grouper web services. Details for deploying and configuring Grouper are out of scope for this document and can be found at the Grouper wiki.
Only available before initial Registry deployment
As of Registry 0.7 using the Registry as a JDBC Subject source for Grouper must be configured before the initial Registry configuration and deployment.
Requires MySQL
As of Registry 0.7 using the Registry as a JDBC Subject source for Grouper requires MySQL. PostgreSQL is not supported as of version 0.7.
Edit the file
registry-source/app/Plugin/Grouper/Config/bootstrap.phpand set the configuration optionGrouper.useCOmanageSubjectSourcetotrue.Storing groups in Grouper requires additional configuration.
If you intend Registry to store and manage group information in Grouper in addition to using Registry as a Subject source for Grouper then read below for additional configuration details.
- Continue with the standard Registry deployment and configuration instructions and return here after deploying Registry.
Configure a Grouper JDBC Subject source to use Registry entries in the database. The recommended
sources.xmlconfiguration is attached.Read access to database for Grouper.
Be sure to grant a Grouper user read access to the Registry database tables and configure the grouper.hibernate.properties file appropriately.
- Use Registry to create COs and add people to the COs. Only CO people and not organizational identities are available as Grouper subjects. After creating CO people you should see them as available subjects in Grouper.
Configuring Registry to Manage Group Information in Grouper
Grouper version 2.1.2
These instructions are written for Grouper version 2.1.2 and assume a working knowledge of Grouper, the Grouper UI, and Grouper web services. Details for deploying and configuring Grouper are out of scope for this document and can be found at the Grouper wiki.
Only available before initial Registry deployment
As of Registry 0.7 managing group information in Grouper must be configured before the initial Registry configuration and deployment.
Grouper subject source is required.
As of Registry 0.7 managing group information in Grouper requires that Grouper use Registry as a subject source. See above for details on how to configure Registry so that Grouper can use it as a subject source.
Requires Grouper web services
Registry manages group information in Grouper using the Grouper web services interface. Please make sure you have a functional Grouper web services deployment before continuing. It may be necessary to set up a temporary subject source for Grouper to be confident that the Grouper web services interfaces are working properly.
- Configure the Grouper web services so that a Grouper user has sufficient privileges to access the web services, create stems and groups, and assign attributes. A typical Grouper web services deployment will include privileged access for the user
GrouperSystemusing a passphrase. We recommend this approach. - Edit the file
registry-source/app/Config/Schema/schema.xmland make the following changes:- In the
<table name="co_groups">element change<field name="id" type="I">to<field name="id" type="C" size="36" >. - In that same table element remove the
<autoincrement />element that is part of the id field definition. - In the
<table name="co_group_members">element change<field name="id" type="I">to<field name="id" type="C" size="36" >. - Also in the
<table name="co_group_members">element change<field name="co_group_id" type="I">to<field name="co_group_id" type="C" size="36">. - In that same table element remove the
<autoincrement />element that is part of the id field definition.
- In the
- Edit the file
registry-source/app/Plugin/Grouper/Config/bootstrap.phpand make the following changes:- Set the configuration option
Grouper.COmanage.useGrouperDataSourcetotrue. - Set the configuration option
COmanage.groupSqlDataSourcetofalsesince Grouper itself is not a relational database store. - Verify that the default setting for
Grouper.schemeofhttpsis correct. We strongly recommend using HTTPS. - Set the configuration option
Grouper.hostto be the fully qualified domain name of the server hosting your Grouper web services deployment. - Verify that the default setting for
Grouper.portof443is correct or change it to be the port used to connect to theGrouper.hoston the server. - Set the configuration option
Grouper.userfor the name of the privileged Grouper user that will be used to create stems, groups, and assign attributes.GrouperSystemis a typical value. - Set the configuration option
Grouper.passfor the associated passphrase for the privileged Grouper user. - Verify that the default setting for
Grouper.basePathofgrouper-system/servicesRest/v2_1_000/is the correct URL prefix for accessing Grouper REST web services for your Grouper web services deployment. Set the configuration option
Grouper.COmanage.baseStemfor the stem that should be used for storing Registry group information. All group information will be stored using stems and groups within the base stem. We recommend the default settingReference:COmanageDataSource.Base stem name change.
If you do not use the default
Reference:COmanageDataSourceas the base stem you must edit the other options inbootstrap.phpand change the stringReference:COmanageDataSourceto the correct base stem for your deployment.
- Set the configuration option
Some attribute definitions need to be made in your Grouper deployment before deploying Registry and using Grouper as a data source. This is most easily done by using a Registry Grouper plugin shell script to create a Grouper Shell (GSH) script and then executing the GSH script. To create the script:
$ cd app
$ ./Console/cake Grouper.makeAttributeDefScript /tmp/attrdefs.gsh
Execute the attribute definition script using GSH. The details will depend on your Grouper deployment. Here is an example execution of the script:
$ cd /opt/grouper/grouper
$ sudo -u tomcat6 ./bin/gsh.sh < /tmp/attrdefs.gsh
You can use the Grouper Lite UI to verify the creation of the attribute definitions and attribute definition names by filtering for
cm_.- Continue with the standard Registry deployment and configuration instructions and return here after deploying Registry.
- Use Registry to create COs and add people to the COs. Only CO people and not organizational identities are available as Grouper subjects. Then use Registry to create groups for the CO and add people to the groups. You should see the groups stored in Grouper within the COmanage base stem that you configured.
Provisioning Registry Data to Grouper
Provisioning not available in Registry 0.7
As of version 0.7 provisioning Registry data into Grouper is not yet supported.
- Registry provisioning hooks
- Grouper Loader via SQL views